


Application scenario:
1, applicable to the contract content has been confirmed, uploaded to the platform to fill in the content, sign and seal
2. After the local file is uploaded, it can only be filled, signed and stamped, and cannot be edited twice on the platform. If you need to edit, you can complete the editing in the local file and then upload it
Operation steps:
1. Step 1: Upload the local contract file and set the signing task information
2, the second step: set the contract content (need to fill in, need to seal content), submit the task of signing
3. Step 3: Send the contract to the Participant
First, initiate the contract on the computer side
Log in to the platform, enter the home page, click the upper right corner [Upload signed documents] :
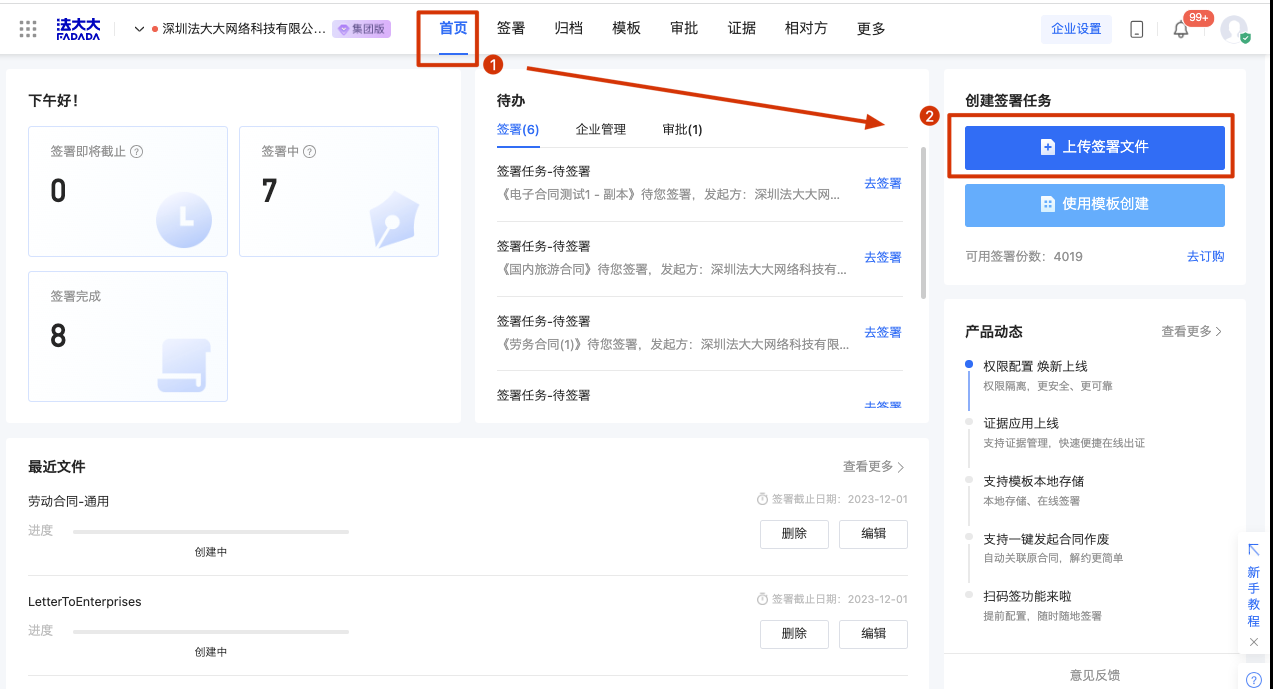
Or go to Sign, click on the top left [Create Task - Create Directly] :
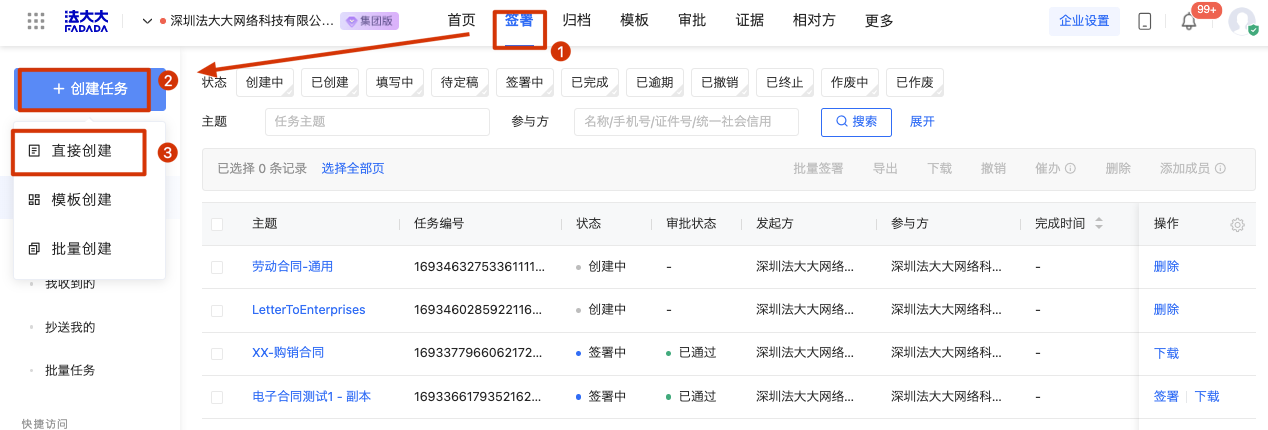
1. Step 1: Upload the local contract file and set the signing task information
On the Create task page, select [Document - Local Upload] and fill in the contract title, participant and other basic information:

1.1 Uploading Local Contract Files
Basic information:
(1) Task theme: refers to the subject content of the signing task, which is mainly used to identify the contract content. By default, the name of the uploaded local file is taken as the task theme. This content will be displayed in the SMS or email sent to the participant. You are advised to make relevant remarks here.
(2) Deadline: means that the signing task needs to be completed before the deadline, and the default is to be completed within 3 months after the creation of the signing task. If the deadline is exceeded, the signing task will not be filled in or signed again.
(3) Approval process: The signing task can be completed only after approval, and the approval flow must be configured in advance before it can be used.
Document: refers to the content of the document that needs to be filled in, sealed, and signed.
(1) Document type:.doc,.docx, wps,.pdf,.xis,.xlsx,.jpg, -jpeg,.bmp,.png format. A single document does not exceed 50MB.
(2) Number of documents: 50 documents can be uploaded for a single signing task.
Annex: refers to the relevant auxiliary materials used to explain the current signed contract. The contents of the annex do not need to be signed or stamped and cannot be filled out. For example, approve emails, qualification documents, etc.
(1) Attachment type:.doc,.docx, wps,.pdf,.xis,.xlsx,.jpg, -jpeg,.bmp,.png format. A single document should not exceed 50MB3⅝.doc,.docx,.wps, jpg, jpeg,.png, pdf,.xis, xisx,.zip,.rar,.mp4,.AMR,.mp3, wav format, and a single attachment should not exceed 50MB
(2) Number of attachments: 30 attachments can be uploaded for a single signing task.
1.2 Set participant information and signing requirements
Participants: refers to which roles (individuals or enterprises) are required to fill in and sign the contract. For each task, a maximum of 100 participants can be added
(1) Set the signing order: it is divided into sequential signing and disorderly signing. The default value is unordered.
Unordered signature: After the successful initiation, all participants can sign the document contract at the same time
Sequential signature: After the successful initiation, the second signer can sign only after the first participant has signed
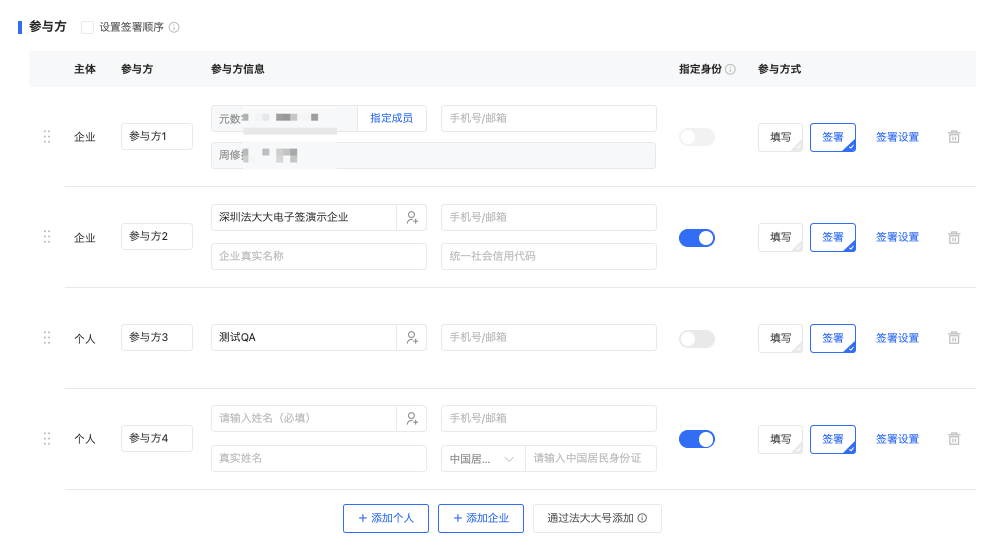
(2) Participant information: the name and contact information of the participant should be filled in for receiving the signing task.
Designated member in the enterprise identity: This task specifies that the member has different permission to fill in, sign, and manage. Selected members can set corresponding permissions to help complete the contract:
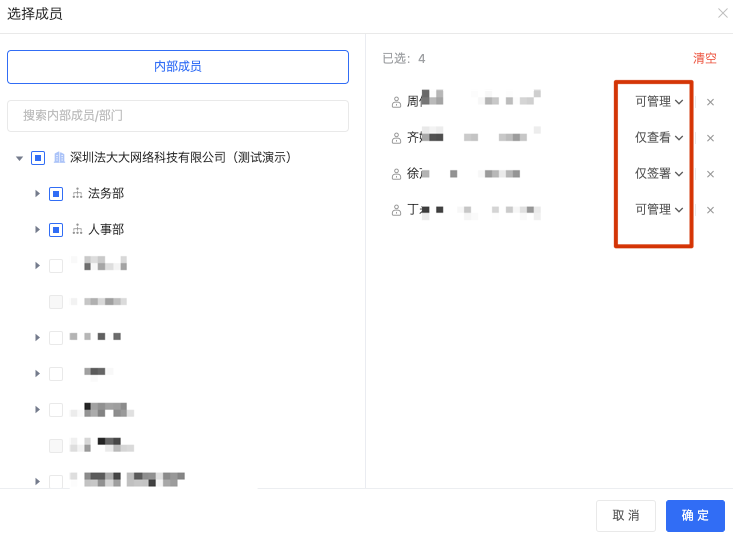
Manageable: means that the member can have the management ability for this contract, such as: cancellation, prompt, continue to add members ability
Sign only: means that the member can see the contract, but only has the authority to stamp it
Fill only: means that the member can see the cover contract, but only the permission to fill in the content of the contract, can not be stamped
(3) Designated identity: It refers to whether the participant needs to use the identity specified by the initiator in order to view and sign the contract. After selecting this function, it is necessary to enter the participant's name, certificate number, enterprise name and code
(4) Participation method: Filling in means that the contract needs to be filled in by the participants, and signing means that the contract needs to be signed and sealed by the participants.
Signature Settings:
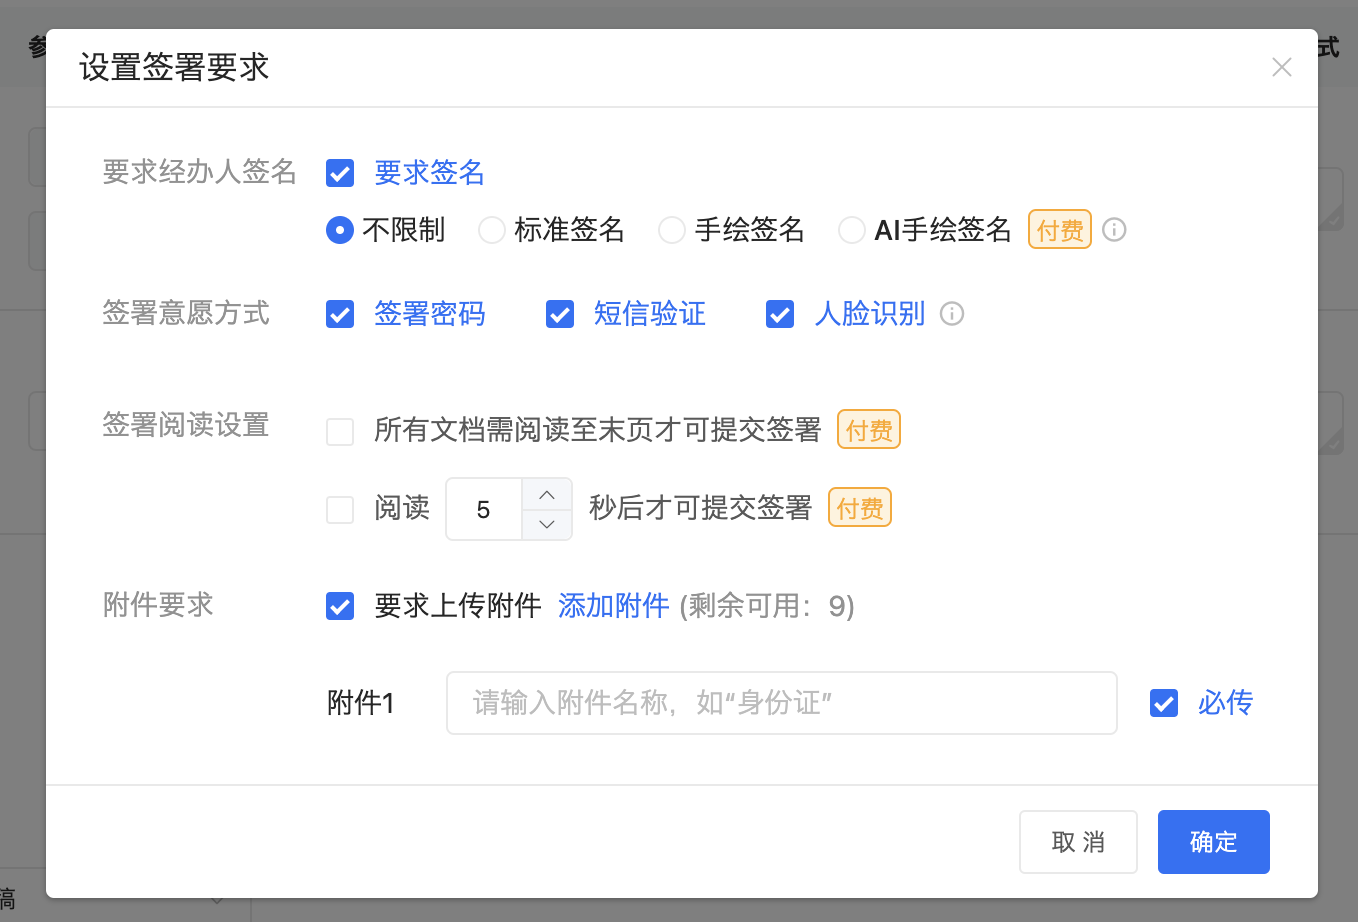
Require the signature of the operator: After checking, the operator of the enterprise participant must affix his personal signature in addition to the corporate seal
Signature intention method: face recognition, SMS verification, signature password, can be selected single or multiple, after checking, the participant must submit the intention verification in the prescribed way
Signing reading Settings: Participants must read the contract or how many seconds after reading it before signing the contract; It is a good way to avoid signing the contract directly without looking at the participants
Attachment requirements: When participants fill in and sign, they should also provide relevant attachment materials (such as ID card, education background and other documents).
Note: AI hand-drawn signature, mandatory reading, only the standard version and above can be supported. If you need consultation, you can contact online customer service.
Delete participants: On the far right of each participant, there is a small icon of "trash can", which can be clicked to delete the corresponding participant
Add an individual: Add an individual user as a participant
Adding an enterprise: Adds an enterprise user as a participant
Add by big number: The task can be accurately stored in the user account, without specifying an identity or entering a mobile account
1.3 Setting Other Content
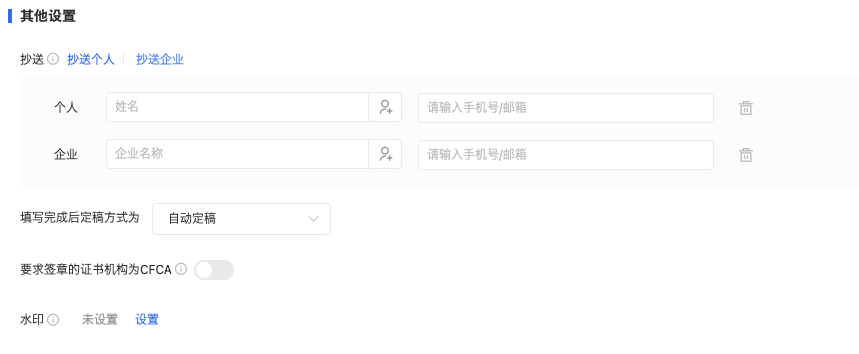
(1) CC: Enterprise and individual users can be added as the viewing party of this contract; After the task is completed and signed, the CC can receive the completion notice and check the contract content and progress.
(2) Finalization method:
Automatic finalization: It means that after the completion of the filling, the content will be automatically finalized and directly enter the signing process
Manual finalization: refers to the content filled in by the participant needs to be reviewed by the initiator, and the initiator can only sign after the review. It can avoid the situation that the content filled in by the participant is wrong or inconsistent with the contract content
Automatically initiate final approval: It means that after the participant completes the information, the content review and approval flow is automatically triggered. After you select this mode, the approval flow must be automatically matched.
(3) The required certificate authority is CFCA: After checking, the participant's seal and signature must be issued by the CFCA institution (the institution can be selected when making the seal).
(4) Watermark: According to the use scenario of the contract, set the watermark content, watermark location, and watermark size
Note: Automatically initiate final approval and watermarking, which can only be supported by the standard version and above. If you need consultation, you can contact online customer service.
2. Step 2: Set the contract content
The setting of contract content refers to the setting of the filling control and signing position of the text of the contract.
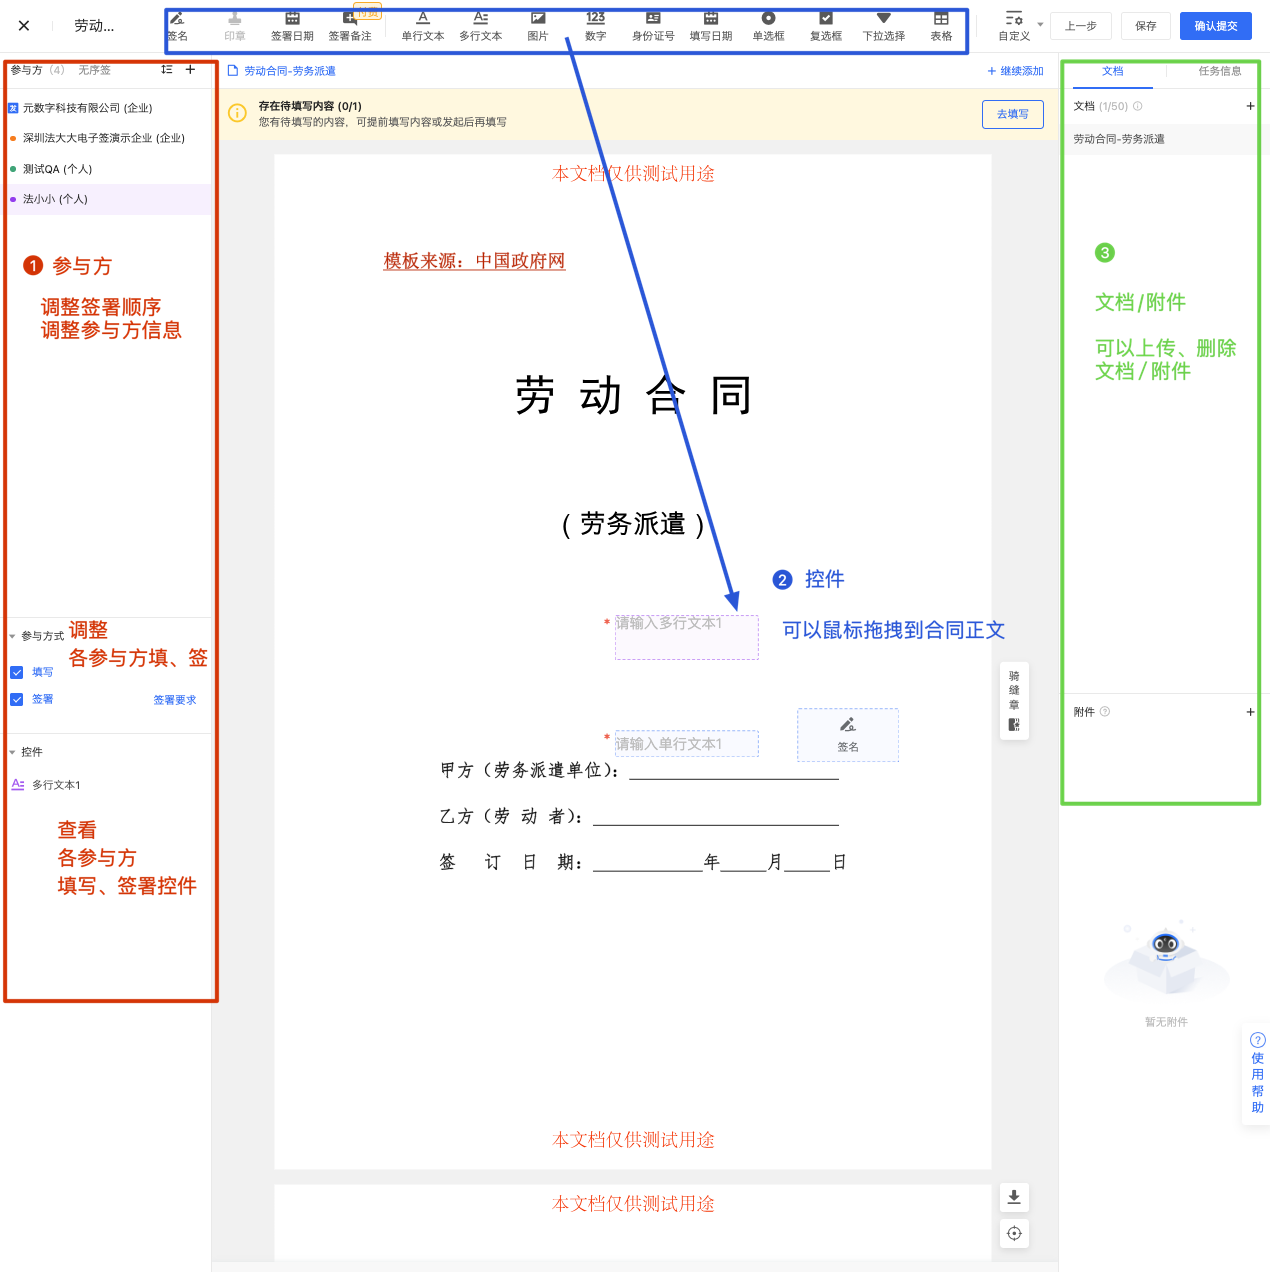
2.1 Setting Participants
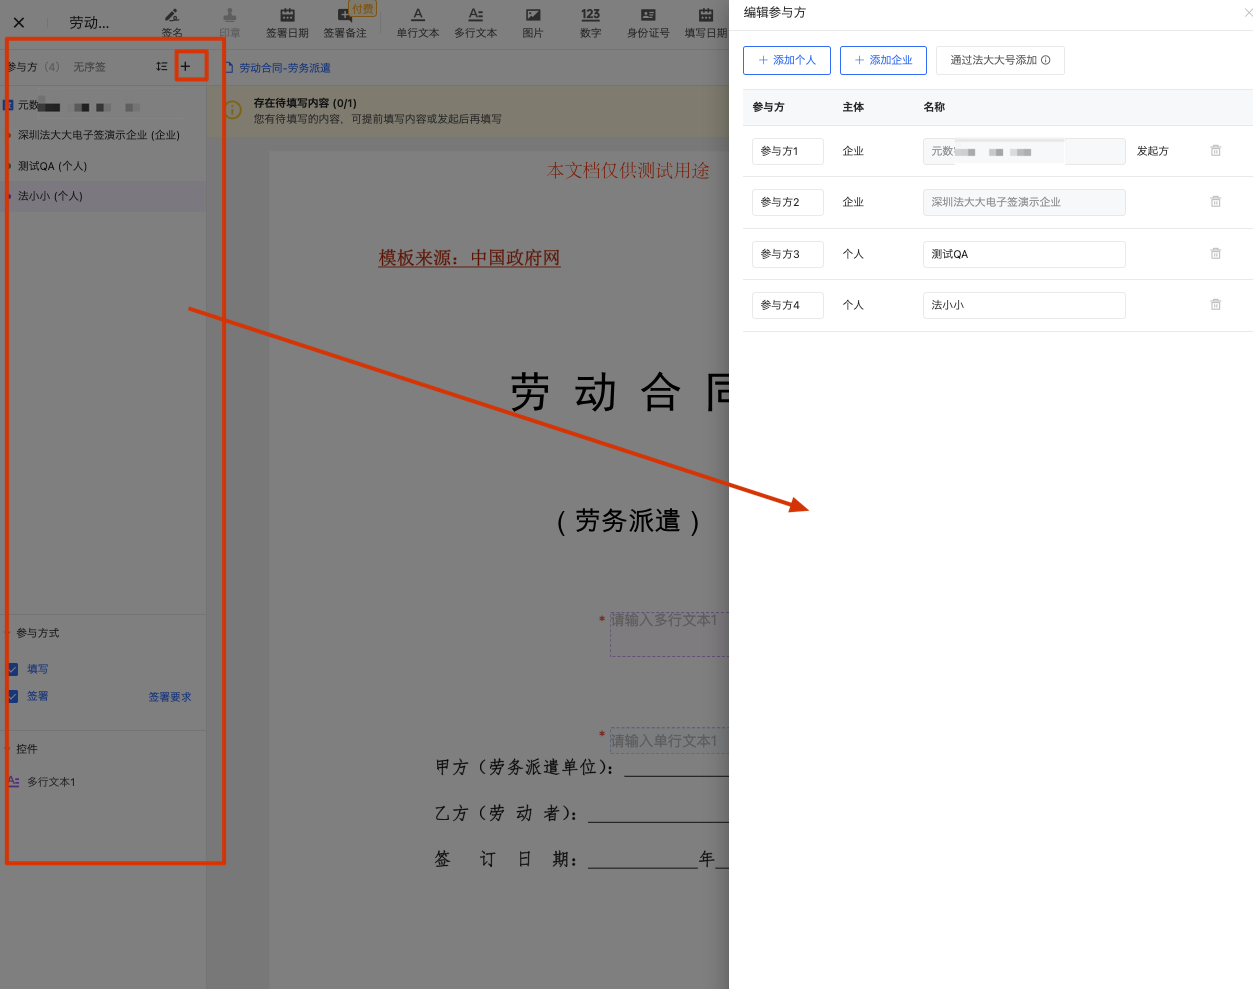
On the left side of the page, you can view the participant added in the previous step. In this case, you can check whether the participant is correct and modify it
Click "+" in the picture below, and the popup window will slide out from the right side, and you can add and delete participants
The participation mode in the red box below means that the participant can be set to fill in or sign
The red box control in the following figure means that the specific controls set for the participant can be clearly seen
2.2 Setting Controls
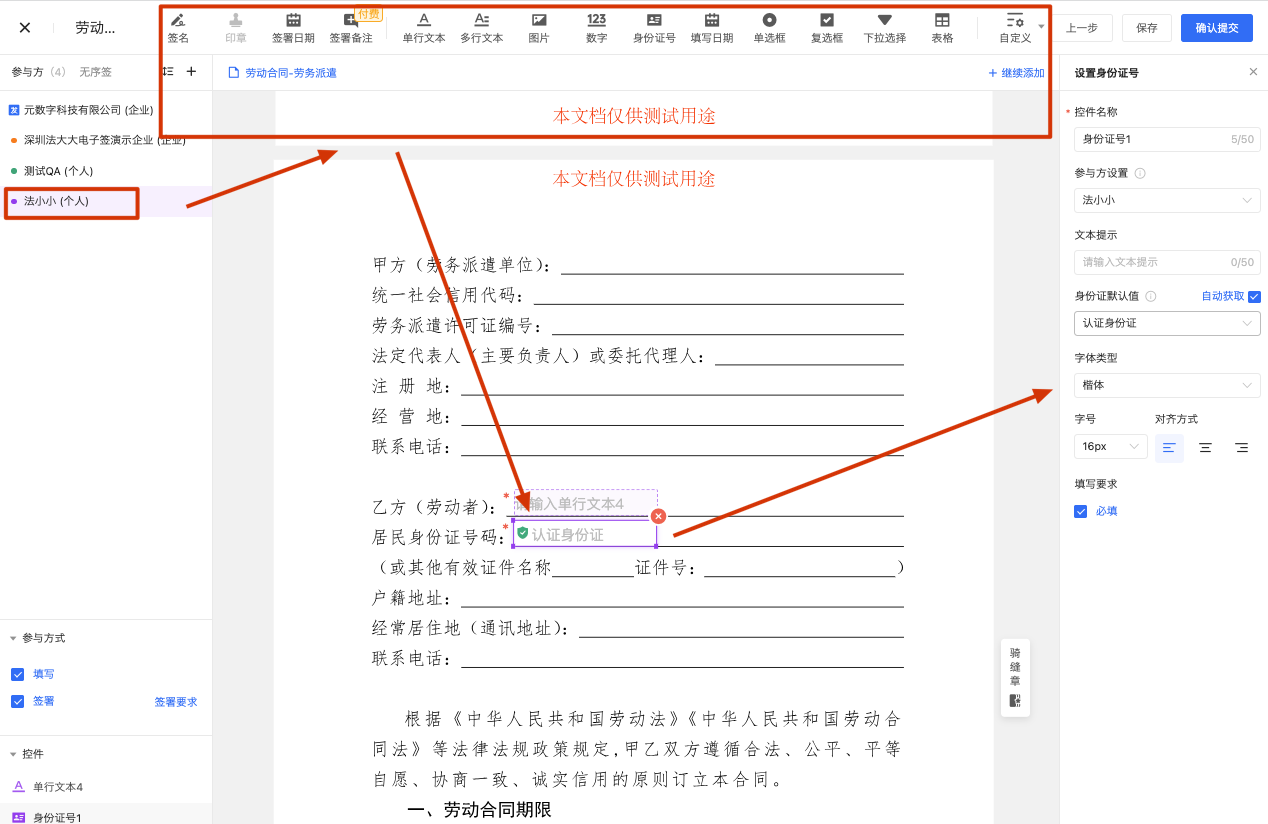
At the top of the page, is the current control style provided by the law, first select the corresponding participant from the left side, and then drag the control to the text of the contract
For each control, you can set parameters within the control, such as control name, prompt text, font, font size, and so on
2.3 Adding Documents and Attachments
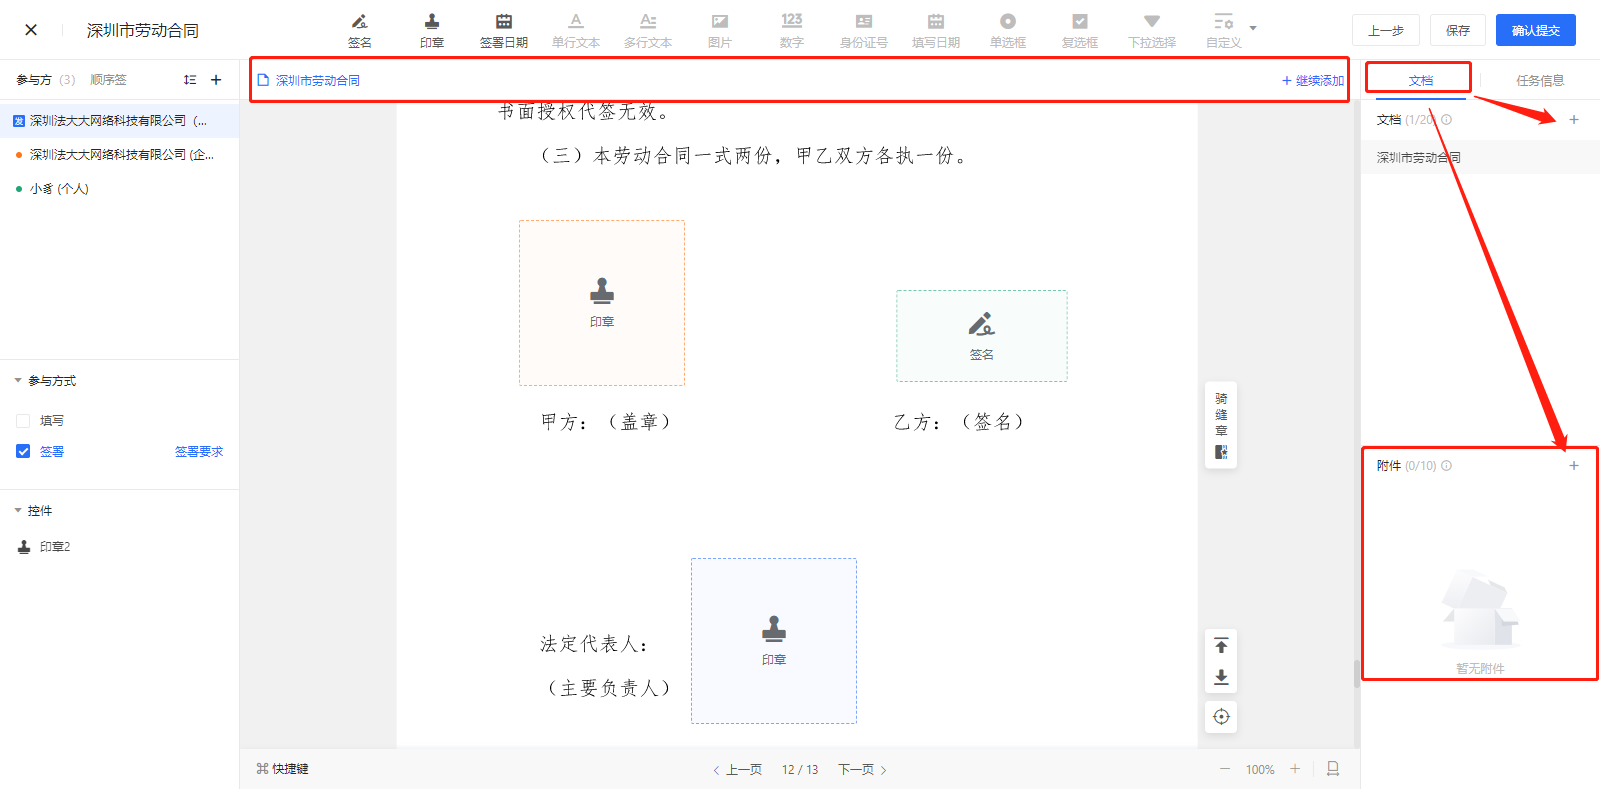
Document: In the previous step, if you feel that there are fewer or more documents uploaded, you can delete and add them in the document area
Attachments: As with adding documents, attachments can also be deleted and added
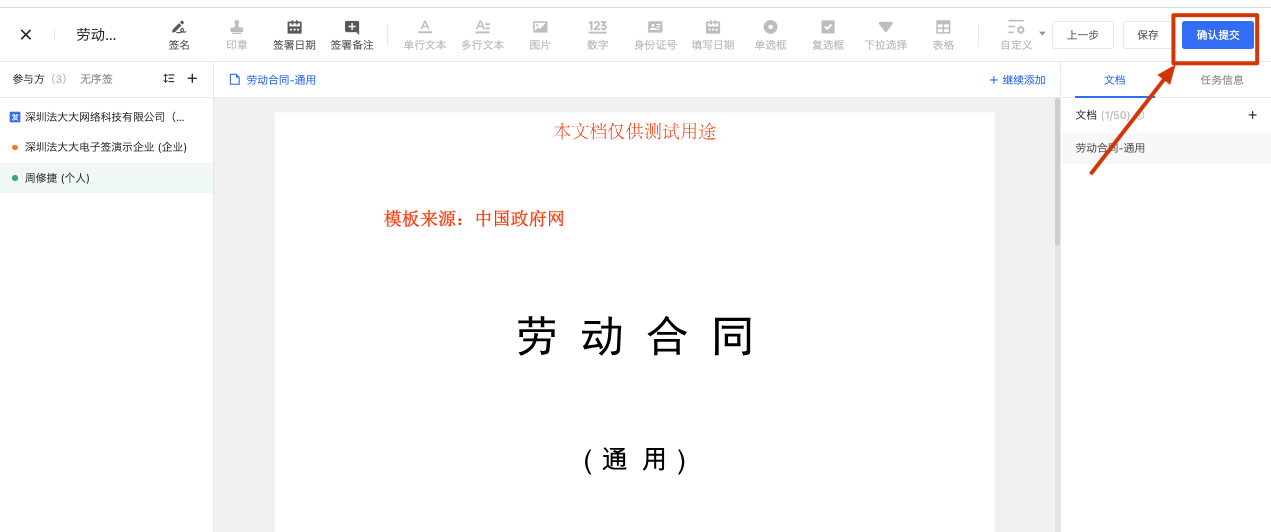
2.3 Submission of the Contract
After confirming that the control, signature location and number of documents in the contract are correct, click "Confirm submission" in the upper right corner of the page, and a notification will be sent to the participant; After the contract is successfully submitted, it cannot be modified or supplemented.
Note: The amount of deduction is based on the number of documents. For example, if employee A initiates a signing task, which contains two documents: labor contract and competition agreement, the deduction amount of the signing task is: 2 copies. Details of the charge rules can be found in: Instructions for Signing the Usage Charge Rules
3. Send the contract
Sending a task means sending the task to the corresponding participant, and the mode of sending can be set and edited.
You can click [Send] in the upper right corner, or click the shortcut entrance (as shown below) :
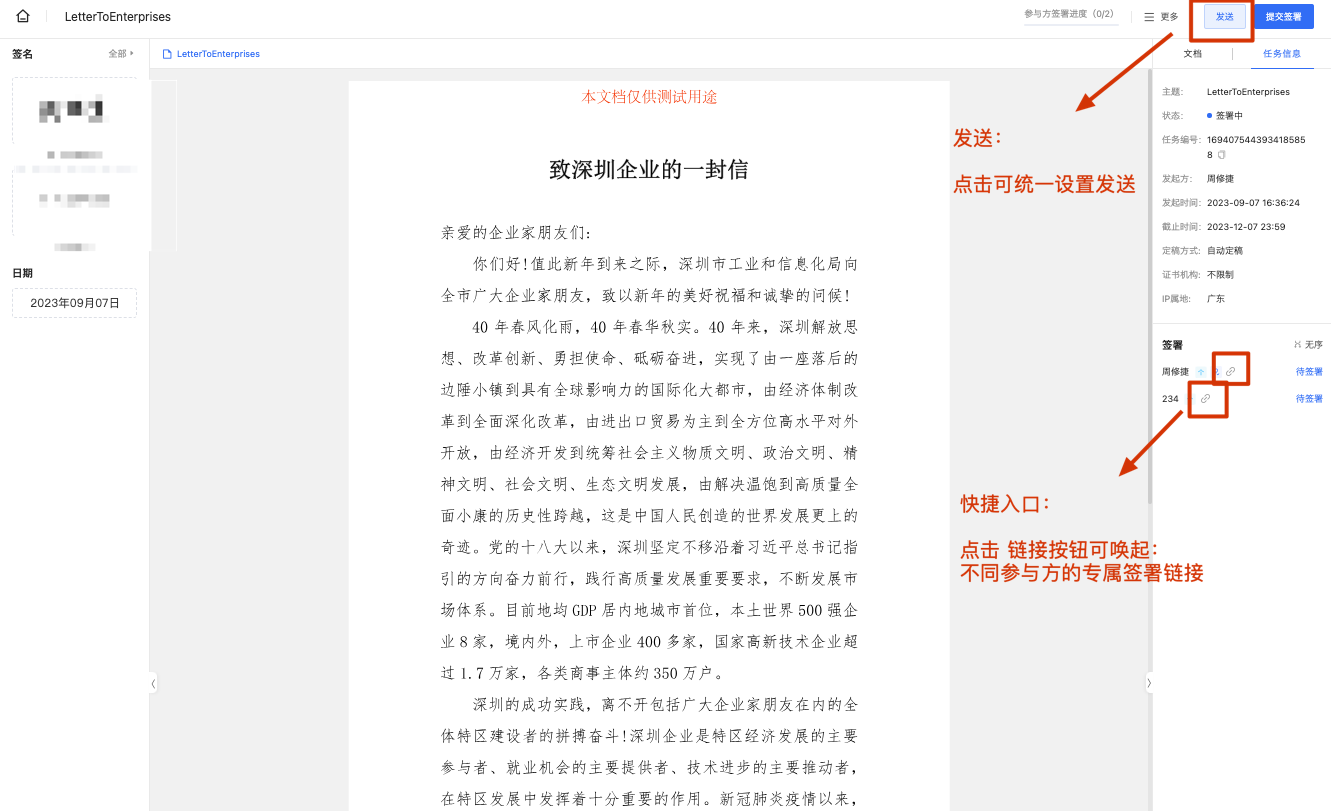
3.1 Click the [Send] button in the upper right corner
The unified setting of the task sending mechanism refers to the setting of the access method for all participants of the whole task when they fill in and sign. On the Sign Task details page, click "Send" in the upper right corner, and the Settings area will be displayed from the right side.
(1) Participant's exclusive link: Copy the exclusive link and send it to the participant. The participant can access the link after logging in with any account, and set the real identity of the participant's access
Application scenario: There is no need to collect participant information in advance, the number of participants is small, and one-to-one communication is convenient

(2) Public link: Exclusive link: Public link: Exclusive access code can be set, participants need to enter the correct access code to join and sign the task
Application scenario: The number of participants is large and the dimensions of identifying participants are diverse
For example, there are 10 students in a live class who need to sign for the class. Different students need to fill in and sign different information. How can we quickly share the contract with each student?
1. Collect the student's wechat signal as the only information in advance, and input it at the access code
(The access code can be understood as the mobile phone number, employee number, wechat signal of different students, etc.)
2, Share the public link to the group, students click the link to log in and enter the corresponding access code to sign
3.2 Click the quick entry to share the exclusive link
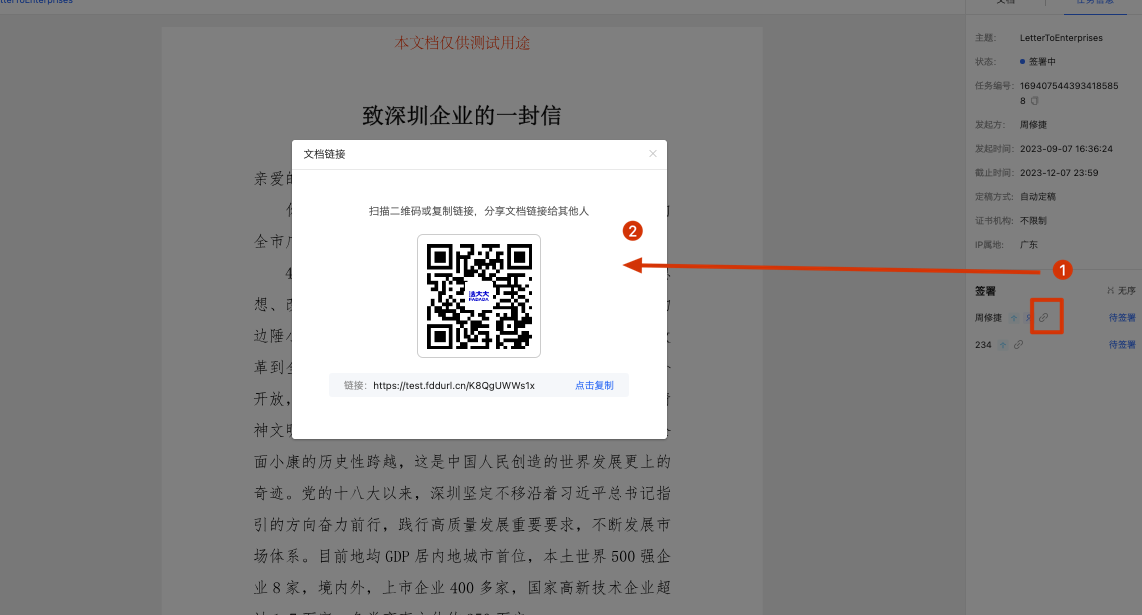
Second, initiate the contract in the small program side
Mobile operation can directly view the video: